How-to Backup Your Emails
It’s always a good idea to back up your emails in case you suffer from sudden data loss. If you are not sure how to make a backup copy, you’ve come to the right place. In this article, we will learn how to back up email messages using three popular desktop email clients.
Acquiring Email Server Details
To receive emails from a web server, a client needs to use a set of so-called protocols. For sending messages, there’s SMTP (Simple Mail Transfer Protocol), while for incoming mail protocols, there are IMAP (Internet Message Access Protocol) and POP3 (Post Office Protocol). The main difference between these two is that IMAP allows email synchronization across multiple devices, while POP3 does not.
You can set up any email to work with an email client, provided that you have the required configuration details of these protocols.
Here’s what you need:
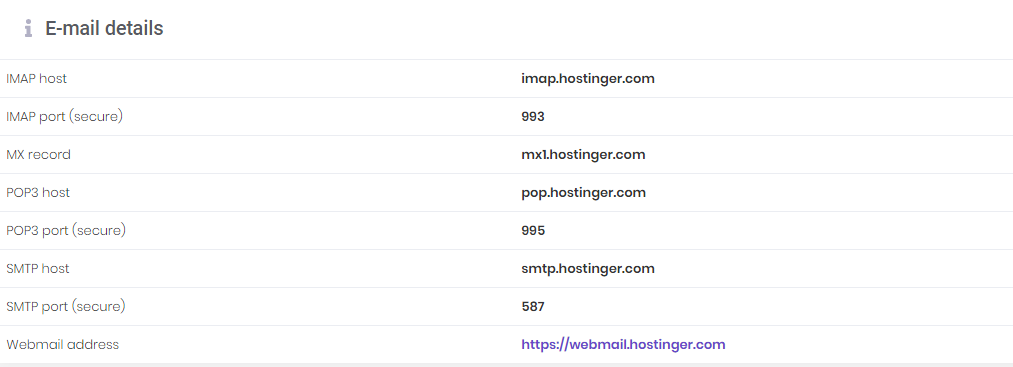
Alternatively, if you’re using Gmail or Yahoo Mail, you need to enable access to these protocols from your account first.
Managing POP Access for Gmail
Setting up POP access in Gmail allows you to store a copy of your messages locally via any email client. By default, this protocol automatically deletes the original one from the webmail’s inbox after downloading it. However, Gmail gives you an option to determine whether to delete, archive, keep, or mark them as read instead.
To enable POP access in Gmail, do the following:
- Log in to your Gmail account, choose Google Account by clicking on your profile’s icon.
- Next, go to Security and scroll down to Less secure app access. Click Allow less secure apps to turn the option on. This needs to be done so Gmail won’t reject a server connection established from the remote client.
- Configure POP settings by going to the Settings page.
- Navigate to Forwarding and POP/IMAP tab. Under the POP download section switch to Enable POP for all mail. In addition, the second option determines what kind of action should be performed to the original messages once a copy is saved. In this example, we’re keeping them.
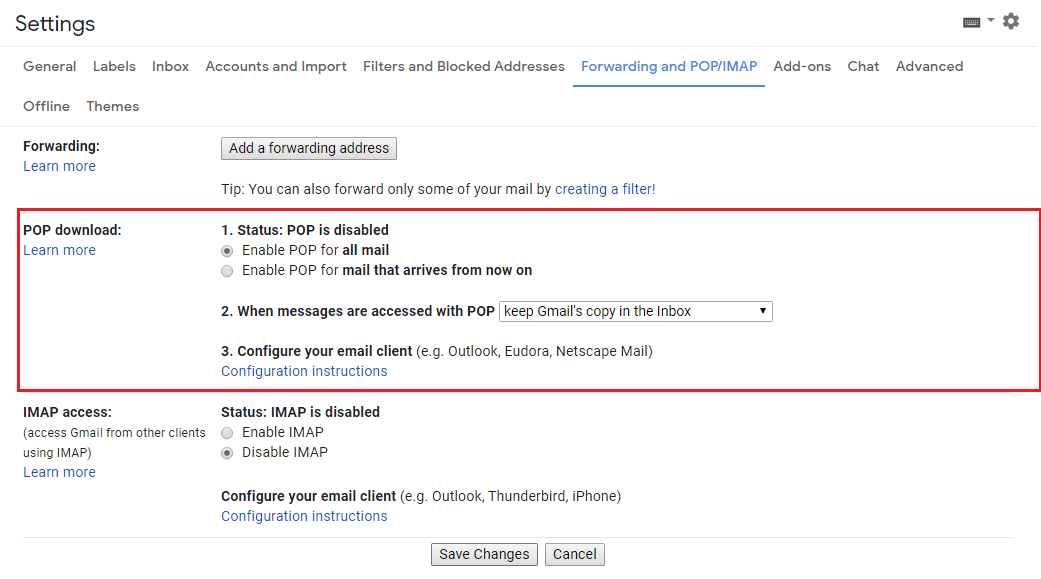
- For Gmail server settings, click Configuration Instructions underneath the Configure your email client option. Scroll down to find the information.
Configuring IMAP Access for Yahoo Mail
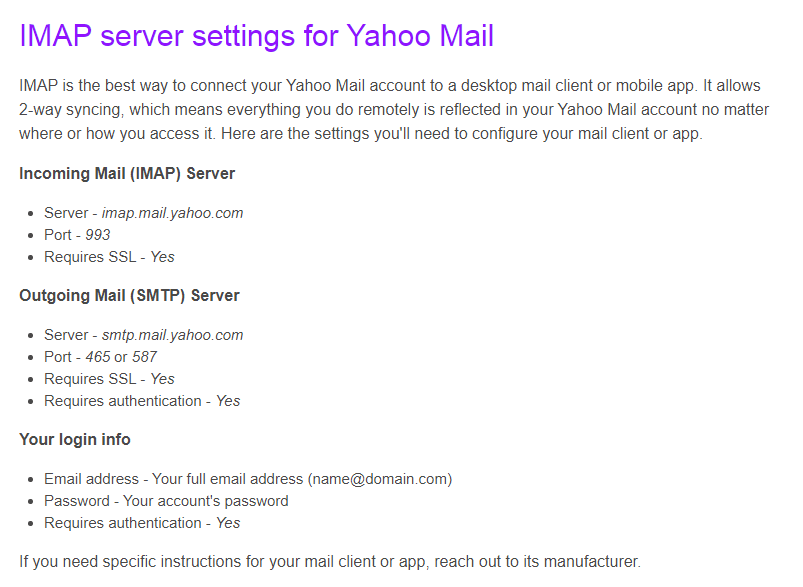
IMAP, as explained earlier, synchronizes messages with the server so they can be accessed from any device. To configure IMAP access for Yahoo Mail, you just need to tweak its security settings.
- Log in to your Yahoo Mail account, click on your icon to find Account Info.
- Go to Account Security and turn on the Allow apps that use less secure sign in option.

- You’ll find IMAP server settings in the Yahoo Help Center.
How to Back Up Emails Using Email Clients
Once you have your email server details, you need to configure your account with the email client to back up your messages. Below you can find the steps to do it using three different email applications.
Backing up Email on Outlook
Begin by adding your email account to Outlook, which you can do by following this tutorial. In the steps below, we will learn how to back up Outlook emails using the 2019 version.
- Click File, choose Open & Export and click on the Import/Export button.
- On a new window choose Export to a file option and hit the Next button.

- Then, choose the Outlook Data File (.pst) as the export format. Click Next again.
- Now select your email account from the list and again, click the Next button.
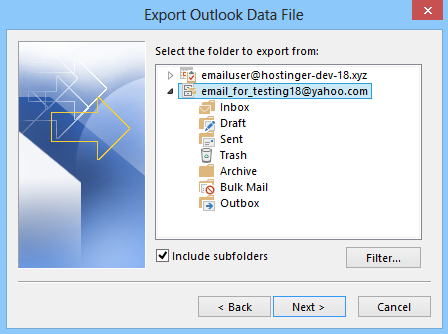
- Finally, choose the destination folder and hit the Finish button. Outlook will prompt you to create an additional password for the backup, but you can skip it by clicking Cancel if you prefer.
As you can see, using Outlook to back up your emails takes only a few clicks.
Backing up Email on Thunderbird
Launch Thunderbird and configure your email by referring to this tutorial. After you’ve finished setting up your account, check your inbox to see whether there is a missing message. If there is, you can synchronize it manually by clicking the Get Messages button.
Now, to back up using Thunderbird can be tricky since this email client does not have an in-built email export feature. However, there is a workaround:
- Create a new folder on your computer (you can name it whatever you want).
- Access the email folder you want to back up in Thunderbird.
- Use CTRL + A (CMD + A for macOS) and select all messages within the folder.
- Right-click on the email messages and choose the Save As option. Locate the folder you’ve made earlier as the save destination.
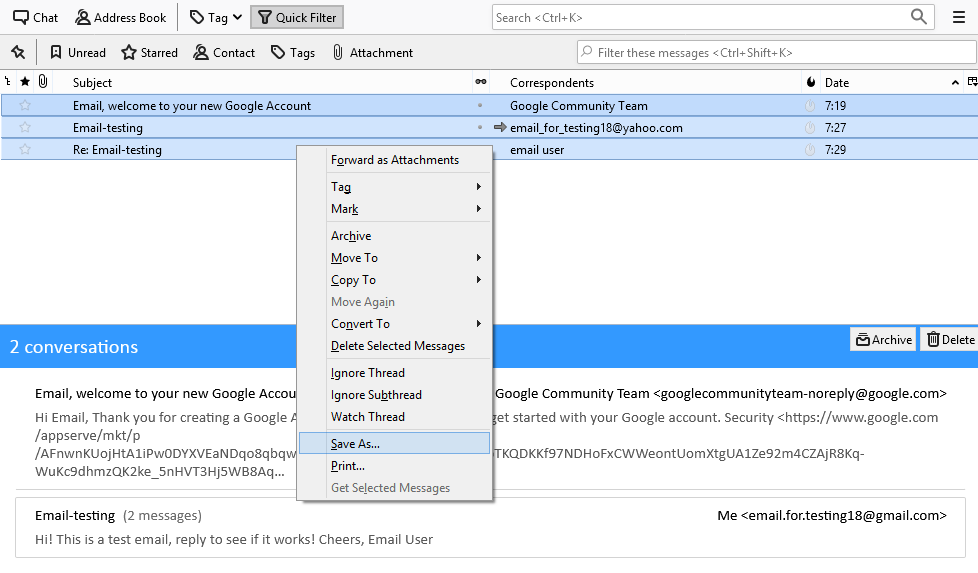
That’s it! Thunderbird will export all the selected email messages in .eml format
Backing Up Emails on Mac Mail
macOS users can back up emails using Apple Mail client. Skip to the fourth step if you already have your account set up:
- Go to Mail -> Add Account.
- Choose the Other Mail Account option. Click Continue.
- Enter your email server details and press Sign In.
- Right-click the email folder you want to backup and choose Export Mailbox.
- Select your destination folder and press the Choose button. Mail will export your emails in the form of .mbox archive.
That’s it, you have successfully backed up your email using Apple Mail. Since the .mbox format is broadly supported by all major email clients, you shouldn’t have any trouble migrating to a different one.
Conclusion
We have learned how to back up emails using Outlook, Thunderbird, and Apple Mail.
Hopefully, this guide made backing up emails less daunting to you!


